5. Configuration
5.1. homematicbidcos.conf
The configuration file for the HomeMatic BidCoS module, homematicbidcos.conf, can be found in Homegear’s family configuration directory (default: /etc/homegear/families). In this file, you can set all family-specific options and configure the communication modules you want to use. The general section looks like this:
[General]

## The BidCoS address of Homegear; it is recommended to change this to a random 3-byte hexadecimal
## value starting with 0xFD (e. g. 0xFD43AB). Change this only if no HomeMatic BidCoS devices
## are paired to Homegear because existing pairings will not work anymore!
#centralAddress = 0xFD0001

## Here, specify an AES key that is 16 bytes (32 characters) long to protect your wireless communication.
## !!! IMPORTANT: We highly recommend changing this key before pairing the first device.
## !!! IMPORTANT: Never lose this key. Without it, your devices will be useless.
## To remove the key from your devices, you need to factory reset them.
rfKey = 00112233445566778899AABBCCDDEEFF

## With each key change, currentRFKeyIndex needs to be
## incremented by 1.
currentRFKeyIndex = 1

## If you change rfKey, put the old key here. In order to change the key, Homegear needs to know both the
## old key and the new one.
## !!! Do not set oldRFKey when you set rfKey for the first time !!!
##oldRFKey = 00112233445566778899AABBCCDDEEFF
Before you start using the HomeMatic BidCoS module, you should change centralAddress to a 3-byte value of your choice, such as 0xFD1C2B or 0xFDD394. We recommend starting the new value with “0xFD”, too, so you do not accidently use an address that a device is already using. You should also change rfKey to secure the communication with your HomeMatic devices.
Warning
Don’t change centralAddress after pairing HomeMatic BidCoS devices to Homegear.
5.2. Communication Modules
5.2.1. Overview
The HomeMatic BidCoS module supports the following communication modules:
If you want a system that works without your having to invest a lot of time, we suggest buying the CUL stick. Of the devices in the list above, it is probably the easiest to use. Additionally, it can be connected to a good antenna, and it also supports AES handshakes and firmware updates.
Note
Of course, you can use multiple communication modules at the same time.
The HomeMatic BidCoS communication modules need to be configured in homematicbidcos.conf.
5.2.2. CUL
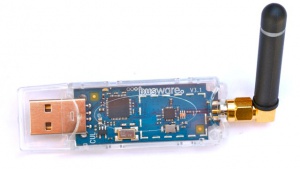
The CUL from busware is the hardware that is easiest to use to communicate with HomeMatic BidCoS devices. The only disadvantage of the CUL is that there is poor control over the packet timing because USB is used.
5.2.2.1. Downloading the Prerequisites
In order to be able to flash the CUL, you need to install dfu-programmer. In Debian, just run:
apt-get install dfu-programmer
5.2.2.2. Flashing the Firmware
Download the firmware from culfw.de and extract it:
wget http://culfw.de/culfw-1.58.tar.gz
tar -zxf culfw-1.58.tar.gz
Switch to the directory with the CUL firmware:
cd CUL_VER_*/culfw/Devices/CUL
Now press the PROGRAM button on the back side of your CUL, and keep it pressed while you plug the CUL in. The green LED should NOT be flashing. Then execute the following commands:
dfu-programmer atmega32u4 erase
dfu-programmer atmega32u4 flash CUL_V3.hex
dfu-programmer atmega32u4 reset
Unplug your CUL, then plug it in again, and you are done!
5.2.2.3. Configuring Homegear to Use the CUL
To tell Homegear to use the CUL, insert the following lines into homematicbidcos.conf:
[CUL]
id = My-CUL
# Uncomment this if you want this CUL to be your default communication module.
#default = true
deviceType = cul
device = /dev/ttyACM0
responseDelay = 95
Of course, you can use multiple CULs with Homegear.
5.2.3. COC/CCD/SCC
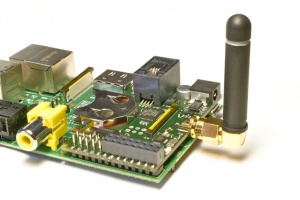
The COC from busware is a Raspberry Pi extension that is used to communicate with wireless home automation devices. Because the communication between the COC and the Raspberry Pi is serial, the packet timing is much better with them than with a CUL.
5.2.3.1. Downloading the Prerequisites
In order to be able to flash the COC, you need to install avrdude. In Debian, just run the following command:
apt-get install avrdude
5.2.3.2. Free up Serial Line and Enable UART
5.2.3.2.1. Raspberry Pi 1 and 2
On the Raspberry Pi 1 and 2 ttyAMA0 might be used by the serial console. To free it up do the following.
Remove any references to ttyAMA0 from /etc/inittab and /boot/cmdline.txt.
Our /boot/cmdline.txt looks like this:
dwc_otg.lpm_enable=0 console=tty1 root=/dev/mmcblk0p2 rootfstype=ext4 elevator=deadline rootwait
5.2.3.2.2. Raspberry Pi 3
On the Raspberry Pi 3 /dev/ttyAMA0 is used by the Wifi and Bluetooth module. There is a “mini UART” available on /dev/ttyS0 by default. It is better though, to use the hardware UART and switch the Wifi/Bluetooth module to mini UART. To do that, add this line at the end of /boot/config.txt:
dtoverlay=pi3-miniuart-bt
Additionally remove any references to ttyAMA0 from /boot/cmdline.txt. Our file looks like this:
dwc_otg.lpm_enable=0 console=tty1 root=/dev/mmcblk0p2 rootfstype=ext4 elevator=deadline rootwait
5.2.3.2.3. All Raspberry Pis
Make sure enable_uart=1 is in /boot/config.txt. Our file looks like this:
.
.
.
enable_uart=1
dtparam=spi=on
dtparam=i2c_arm=on
Disable the serial interface in Raspbian Jessie:
systemctl disable serial-getty@ttyAMA0.service
systemctl disable serial-getty@serial0.service
systemctl disable serial-getty@ttyS0.service
Reboot the Raspberry Pi.
Warning
If you’re using the official Raspbian, you need to comment the lines containing “gpio” in file /etc/udev/rules.d/99-com.rules (place a “#” at the beginning of the lines) for Homegear to be able to access the GPIOs.
5.2.3.3. Flashing the Firmware
Download the firmware from culfw.de and extract it:
wget http://culfw.de/culfw-1.58.tar.gz
tar -zxf culfw-1.58.tar.gz
Switch to the directory with the COC firmware:
cd CUL_VER_*/culfw/Devices/COC
Then execute the following commands (just copy and paste them):
if test ! -d /sys/class/gpio/gpio17; then echo 17 > /sys/class/gpio/export; fi
if test ! -d /sys/class/gpio/gpio18; then echo 18 > /sys/class/gpio/export; fi
echo out > /sys/class/gpio/gpio17/direction
echo out > /sys/class/gpio/gpio18/direction
echo 0 > /sys/class/gpio/gpio18/value
echo 0 > /sys/class/gpio/gpio17/value
sleep 1
echo 1 > /sys/class/gpio/gpio17/value
sleep 1
echo 1 > /sys/class/gpio/gpio18/value

avrdude -p atmega1284p -P /dev/ttyAMA0 -b 38400 -c avr109 -U flash:w:COC.hex
5.2.3.4. Configuring Homegear to Use the COC/CCD/CSM/SCC
To tell Homegear to use the COC, insert these lines into homematicbidcos.conf:
[COC/CCD/CSM/SCC]
id = My-COC
# Uncomment this if you want this device to be your default communication module.
#default = true
deviceType = coc
device = /dev/ttyAMA0
responseDelay = 95
gpio1 = 17
gpio2 = 18
# Set stackPositition if you use stacking (starting with "1" for the SCC at the bottom).
# stackPosition = 1
If you want to stack multiple SCCs, you need to set “stackPosition”. Use “1” for the SCC at the bottom, “2” for the second SCC, “3” for the next one, and so on.
5.2.4. CUNX
To tell Homegear to use the CUNX, insert these lines into homematicbidcos.conf:
[CUNX]
id = My-CUNX
# Uncomment this if you want this CUNX to be your default communication module.
#default = true
deviceType = cunx
# IP address of your CUNX
host = 192.168.178.100
port = 2323
responseDelay = 93
Of course, you can use multiple CUNXs.
5.2.5. Homegear Gateway
5.2.5.1. Certificate Generation
First you need to create certificates for the Gateway service. We don’t want an insecure gateway so there is no possibility to use it without creating them. If not done already, start by following the instructions to create a certificate authority in the Homegear manual.
First create the gateway certificates using Homegear Management:
homegear -e rc 'print_v($hg->managementCreateCert("my-gateway"));'
Replace my-gateway with an arbitrary name (it doesn’t need to be the hostname of the gateway). The name will be used to set the field COMMON NAME of the certificate. It has to be the same as set to the setting id in homematicbidcos.conf (see below).
The output of the command looks similar to:
(Struct length=5)
{
  [caPath]
  {
    (String) /etc/homegear/ca/cacert.pem
    {
      [certPath]
      {
        (String) /etc/homegear/ca/certs/homematic-gateway-02.crt
      }
      [commonNameUsed]
      {
        (String) homematic-gateway-02
      }
      [filenamePrefix]
      {
        (String) homematic-gateway-02
      }
      [keyPath]
      {
        (String) /etc/homegear/ca/private/homematic-gateway-02.key
      }
    }
  }
}
In case your chosen name contained invalid characters, commonNameUsed returns the corrected name that will be used in the certificate. certPath is the path Homegear tries to create the certificate in, keyPath the path to the private key file. The actual certificate generation starts in background. To check if the command has finished, execute:
homegear -e rc 'print_v($hg->managementGetCommandStatus());'
This returns the command output and the exit code. The command has finished if the exit code is other than 256. On success the exit code is 0.
5.2.5.2. Find Gateways
If you don’t know the IP address of your gateway, you can search and print all unconfigured gateways with the following command:
homegear -e rc '$devices=$hg->ssdpSearch("urn:schemas-upnp-org:device:basic:1", 5000);foreach($devices as $device){if(!array_key_exists("additionalFields", $device) || !array_key_exists("hg-family-id", $device["additionalFields"]) || !array_key_exists("hg-gateway-configured", $device["additionalFields"])) continue; if($device["additionalFields"]["hg-family-id"] != "0" || $device["additionalFields"]["hg-gateway-configured"] != "0") continue; print($device["ip"].PHP_EOL);}'
5.2.5.3. Homegear Gateway Service
If you have a preconfigured Homegear Gateway you can skip this section. This section covers the installation of the Homegear Gateway service. First setup a computer with Debian, Raspbian or Ubuntu and connect a serial communication module or USB stick with culfw (e. g. CUL, COC, SCC, …) or a TI CC1101 SPI module.
Add the Homegear APT repository and install Homegear Gateway:
apt install homegear-gateway
Open /etc/homegear/gateway.conf and set the settings for your communication module, e. g. for a CUL on device ttyACM0:
family = HomeMaticCulfw
device = /dev/ttyACM0
Note the configurationPassword, we need below.
Restart the gateway service.
service homegear-gateway restart
Check /var/log/homegear-gateway/homegear-gateway.log for errors. If everything is working, the logfile should say Startup complete and print a warning that the gateway is unconfigured.
Note
To reset a gateway (make it “unconfigured”), delete the files <dataPath>/ca.crt, <dataPath>/gateway.crt and <dataPath>/gateway.key. dataPath is configured in /etc/homegear/gateway.conf.
5.2.5.4. Homegear
To configure a gateway, execute:
homegear -e rc '$hg->configureGateway("<IP>", 2018, file_get_contents("/etc/homegear/ca/cacert.pem"), file_get_contents("/etc/homegear/ca/certs/<your-cert>.crt"), file_get_contents("/etc/homegear/ca/private/<your-cert>.key"), "<your-configuration-password>");'
Replace <your-cert> with the value of commonNameUsed from above, <IP> with the IP address of your gateway and <your-configuration-password> with configurationPassword from the gateway.conf of the gateway service or the password printed on your gateway.
This command transmits the certificates to the gateway encrypted with the configuration password. If no error occurs, the gateway is immediately usable.
Open /etc/homegear/families/homematicbidcos.conf on your Homegear server and add the following lines to the bottom of the file:
[Homegear Gateway]
id = <commonNameUsed>
deviceType = homegeargateway
host = <IP>
port = 2017
caFile = /etc/homegear/ca/cacert.pem
certFile = /etc/homegear/ca/certs/gateway-client.crt
keyFile = /etc/homegear/ca/private/gateway-client.key
responseDelay = 98
useIdForHostnameVerification = true
Replace commonNameUsed with the value from above (used for certificate verification) and <IP> with the IP address of your gateway.
Now restart Homegear and check /var/log/homegear/homegear.log or homegear.err for errors.
5.2.6. HomeMatic Wireless Module for Raspberry Pi (HM-MOD-RPI-PCB)
..warning:: Please make sure firmware version 1.4.1 is installed. Older or newer firmware versions won’t work.
5.2.6.1. Free Up Serial Line and Enable UART
5.2.6.1.1. All Raspberry Pis
ttyAMA0 or serial0 might be used by the serial console. To free it up do the following.
Remove any references to ttyAMA0 and serial0 from /etc/inittab and /boot/cmdline.txt.
Our /boot/cmdline.txt looks like this:
dwc_otg.lpm_enable=0 console=tty1 root=/dev/mmcblk0p2 rootfstype=ext4 elevator=deadline rootwait
5.2.6.1.2. Raspberry Pi 3
On the Raspberry Pi 3 /dev/ttyAMA0 is used by the Wifi and Bluetooth module. There is a “mini UART” available on /dev/ttyS0 by default. It is better though, to use the hardware UART and switch the Wifi/Bluetooth module to mini UART. To do that, add this line at the end of /boot/config.txt:
dtoverlay=pi3-miniuart-bt
Additionally remove any references to ttyAMA0 from /boot/cmdline.txt. Our file looks like this:
dwc_otg.lpm_enable=0 console=tty1 root=/dev/mmcblk0p2 rootfstype=ext4 elevator=deadline rootwait
5.2.6.1.3. All Raspberry Pis
Make sure enable_uart=1 is in /boot/config.txt. Our file looks like this:
.
.
.
enable_uart=1
dtparam=spi=on
dtparam=i2c_arm=on
Disable the serial interface in Raspbian Jessie:
systemctl disable serial-getty@ttyAMA0.service
systemctl disable serial-getty@serial0.service
systemctl disable serial-getty@ttyS0.service
Reboot the Raspberry Pi.
Warning
If you’re using the official Raspbian, you need to comment the lines containing “gpio” in file /etc/udev/rules.d/99-com.rules (place a “#” at the beginning of the lines) for Homegear to be able to access the GPIOs.
5.2.6.2. Configuring Homegear to Use the HM-MOD-RPI-PCB
To tell Homegear to use the HM-MOD-RPI-PCB, insert these lines into homematicbidcos.conf:
[HomeMatic Wireless Module for Raspberry Pi]
id = My-HM-MOD-RPI-PCB
# Uncomment this if you want the HM-MOD-RPI-PCB to be your default communication module.
#default = true
deviceType = hm-mod-rpi-pcb
device = /dev/ttyAMA0
responseDelay = 95
gpio1 = 18
5.2.7. HomeMatic LAN Configuration Adapter (HM-CFG-LAN)
To tell Homegear to use the HM-CFG-LAN, insert these lines into homematicbidcos.conf:
[HM-CFG-LAN]
id = My-HM-CFG-LAN
# Uncomment this if you want this HM-CFG-LAN to be your default communication module.
#default = true
deviceType = hmcfglan
# IP address of your HM-CFG-LAN
host = 192.168.178.100
port = 1000
# Put the AES key printed on your HM-CFG-LAN here
lanKey = 00112233445566778899AABBCCDDEEFF
responseDelay = 60
Of course, you can connect multiple LAN Configuration Adapters to Homegear.
5.2.8. HomeMatic LAN Gateway (HM-LGW)
To tell Homegear to use the HM-LGW, insert these lines into homematicbidcos.conf:
[HomeMatic Wireless LAN Gateway]
id = My-HM-LGW
# Uncomment this if you want this HM-LGW to be your default communication module.
#default = true
deviceType = hmlgw
# IP address of your HM-LGW
host = 192.168.178.100
port = 2000
portKeepAlive = 2001
# Put the security key printed on your HM-LGW here
lanKey = SecurityKey
responseDelay = 60
# Some LAN-Gateways do not send packets correctly. If sent packets are not received by the
# devices (you get error messages, that packets were not received after 3 retries), set
# sendFix to true.
#sendFix = false
Of course, you can connect multiple gateways to Homegear. Take a look at the option sendFix if your LAN Gateway appears not to be working.
5.2.9. HomeMatic USB Configuration Adapter (HM-CFG-USB[-2])
So that you can use the HM-CFG-USB with Homegear, you need to set up the HM-CFG-USB{,2} linux utilities first. After that, you can use the HM-CFG-USB like a HM-CFG-LAN.
To tell Homegear to use the HM-CFG-USB, insert these lines into homematicbidcos.conf:
[HM-CFG-USB]
id = hmland
# Uncomment this if you want this HM-CFG-USB to be your default communication module.
#default = true
deviceType = hmcfglan
# IP address running the hmland service
host = 127.0.0.1
# Port number of the hmland service
port = 1234
responseDelay = 60
5.2.10. Texas Instruments CC1101
See the figure explaining how to connect the CC1101 to the Raspberry Pi. You can use the module on other computers, too, as a matter of course. There are only two requirements:
One interrupt supporting GPIO
Userspace SPI device (like /dev/spidevX.X)

Thanks to Qnerd.
Note
See this forum post for more detailed information.
Warning
On the raspberry pi make sure SPI is enabled. You can enable SPI with raspi-config under Advanced Options => SPI or by setting dtparam=spi=on in /boot/config.txt.
Warning
If you’re using the official Raspbian, you need to comment the lines containing “gpio” in file /etc/udev/rules.d/99-com.rules (place a “#” at the beginning of the lines) for Homegear to be able to access the GPIOs.
To tell Homegear to use the CC1101, insert these lines into homematicbidcos.conf:
[TI CC1101 Module]
id = My-CC1101
# Uncomment this if you want this HM-CFG-USB to be your default communication module.
#default = true
deviceType = cc1100
# The SPI device, the module is connected to.
device = /dev/spidev0.0
responseDelay = 100
# The interrupt pin to use. "0" for GDO0 or "2" for GDO2.
# You only need to connect one of them. Specify the GPIO
# you connected the interrupt pin to below.
interruptPin = 2
# The GPIO GDO0 or GDO2 is connected to. Specify which GDO to use above.
gpio1 = 25
5.2.11. Texas Instruments CC1101 with CC1190
Follow the instructions for the CC1101 above. Then insert these lines into homematicbidcos.conf:
id = My-CC1101
# Uncomment this if you want this HM-CFG-USB to be your default communication module.
#default = true
deviceType = cc1100
# The SPI device, the module is connected to.
device = /dev/spidev0.0
responseDelay = 100
# The interrupt pin to use. "0" for GDO0 or "2" for GDO2.
# You only need to connect one of them. Specify the GPIO
# you connected the interrupt pin to below.
interruptPin = 2
# The GPIO GDO0 or GDO2 is connected to. Specify which GDO to use above.
gpio1 = 25

### Additional TI CC1190 Config ###
# The GPIO high gain mode of the CC1190 is connected to.
gpio2 = 5

# The hexadecimal value for the PATABLE of the TI CC1101.
# Set to 0x27, if high gain mode is enabled. That is the maximum legally allowed setting.
txPowerSetting = 0x27
Note
See the Homegear forum for more detailed information.