5. Configuration
5.1. homematicwired.conf
To use HomeMatic Wired devices, first install the Homegear module as described in chapter Installation.
The configuration file for the HomeMatic Wired module, homematicwired.conf, can be found in Homegear’s family configuration directory (default: /etc/homegear/families). In this file you can configure the communication modules you want to use.
5.2. Communication Modules
5.2.1. Overview
The HomeMatic Wired module supports the following communication modules:
5.2.2. HomeMatic Wired LAN Gateway (HMW-LGW)
To tell Homegear to use the HMW-LGW, insert these lines into homematicwired.conf:
[HomeMatic Wired RS485 LAN Gateway]
# Specify an unique id here to identify this device in Homegear
id = My-HMW-LGW
deviceType = hmwlgw
# IP address of your HMW-LGW
host = 192.168.178.100
# First Port number your HMW-LGW listens on. Normally 1000.
port = 1000
# Put the security key printed on your HMW-LGW here
lanKey = SecurityKey
# Should be "13" for serial modules, "20" for USB modules and "8" for HMW-LGW.
responseDelay = 8
5.2.3. RS485 USB Module
Insert these lines into homematicwired.conf:
[RS485 - USB Module]
# Specify an unique id here to identify this device in Homegear
id = My-RS485
# Options: rs485, hmwlgw
deviceType = rs485
# Mostly /dev/ttyACM0 or /dev/ttyUSB0
device = /dev/ttyUSB0
# Should be "13" for serial modules, "20" for USB modules and "8" for HMW-LGW.
responseDelay = 20
# Set to "true" for USB modules
oneWay = true
5.2.4. RS485 Serial Module
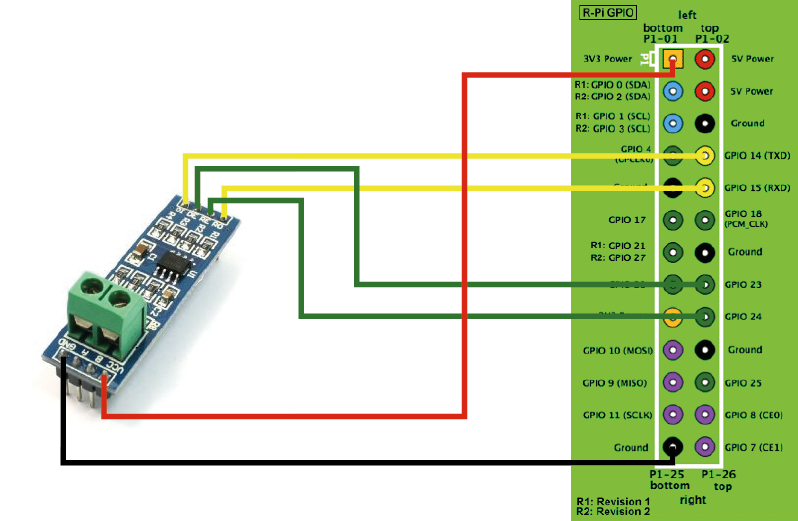
5.2.4.1. Connecting the Module
Connect the module to your computer like this:
RS485 Module |
PC |
|---|---|
DI (Driver Input) |
UART TXD |
DO (Receiver Output) |
UART RXD |
DE (Driver Enable) |
Any GPIO (change the index in |
RE (Receiver Enable) |
Any GPIO (change the index in |
VCC |
3.3V or 5V, depending on your module |
GND |
Ground |
5.2.4.2. Free up Serial Line and Enable UART
5.2.4.2.1. Raspberry Pi 1 and 2
On the Raspberry Pi 1 and 2 ttyAMA0 might be used by the serial console. To free it up do the following.
Remove any references to ttyAMA0 from /etc/inittab and /boot/cmdline.txt.
Our /boot/cmdline.txt looks like this:
dwc_otg.lpm_enable=0 console=tty1 root=/dev/mmcblk0p2 rootfstype=ext4 elevator=deadline rootwait
5.2.4.2.2. Raspberry Pi 3
On the Raspberry Pi 3 /dev/ttyAMA0 is used by the Wifi and Bluetooth module. There is a “mini UART” available on /dev/ttyS0 by default. It is better though, to use the hardware UART and switch the Wifi/Bluetooth module to mini UART. To do that, add this line at the end of /boot/config.txt:
dtoverlay=pi3-miniuart-bt
Additionally remove any references to ttyAMA0 from /boot/cmdline.txt. Our file looks like this:
dwc_otg.lpm_enable=0 console=tty1 root=/dev/mmcblk0p2 rootfstype=ext4 elevator=deadline rootwait
5.2.4.2.3. All Raspberry Pis
Make sure enable_uart=1 is in /boot/config.txt. Our file looks like this:
.
.
.
enable_uart=1
dtparam=spi=on
dtparam=i2c_arm=on
Disable the serial interface in Raspbian Jessie:
systemctl disable serial-getty@ttyAMA0.service
systemctl disable serial-getty@serial0.service
systemctl disable serial-getty@ttyS0.service
Reboot the Raspberry Pi.
5.2.4.3. Configuring Homegear to Use the Module
Insert these lines into homematicwired.conf:
[RS485 - Serial Module]
# Specify an unique id here to identify this device in Homegear
id = My-RS485
deviceType = rs485
device = /dev/ttyAMA0
# Should be "13" for serial modules, "20" for USB modules and "8" for HMW-LGW.
responseDelay = 13
# Set to "true" for USB modules
oneWay = false
# GPIO to enable RX
gpio1 = 22
# Set GPIO to this value to enable RX
enableRXValue = 0
# GPIO to enable TX
gpio2 = 17
# Set GPIO to this value to enable TX
enableTXValue = 1
# !!!EXPERIMENTAL!!!
# Reduces the time for the bus to become free from about 200 ms
# to about 100 ms.
#fastSending = true